
This is the next major step in my programmable taillight project for the 1989 Fox Body Mustang. The controller has moved beyond the original ESP32-S3 DevKit wiring and now has a dedicated firmware target for my custom PCB. The board brings the lighting outputs, isolated factory-signal inputs, CAN interface, and spare expansion I/O into one purpose-built controller while keeping the same 760-pixel taillight system.
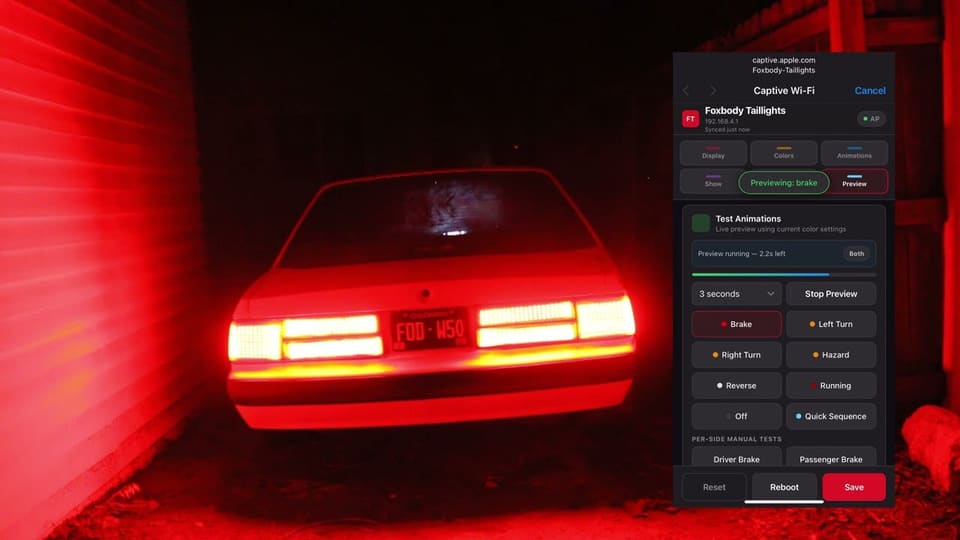 Updated Foxbody taillight controller and custom PCB demonstration.youtube.com
What Changed in This Revision
The original version proved the lighting architecture on an ESP32-S3 development board with external optocoupler and MCP2515 modules. This update keeps that software architecture but adds a separate esp32-s3-pcb PlatformIO environment for the custom board. That build is now the default, so the same codebase can target either the earlier DevKit setup or the new PCB without maintaining two different firmware projects.
- Dedicated custom-PCB pin map selected at compile time
- Three LED data outputs: driver, passenger, and one spare
- Six optocoupled 12V input channels, including one spare input
- Onboard MCP2515 CAN interface operating at 500 kbit/s
- Two additional spare GPIO connections for future expansion
- Updated FastLED output timing for reliable dual-panel rendering
Taillight Panel Architecture
Each side still contains 380 WS2812B LEDs, for 760 addressable pixels total. A side is divided into three serpentine matrices: a 21 × 5 top strip, a 21 × 5 bottom strip, and a 17 × 10 main section. The top strip sits behind a clear section of the lens, while the lower strip and main panel sit behind red diffusers. The firmware applies diffuser-aware color filtering automatically, so an animation can be written in normal RGB values and the panel layer handles the physical lens restrictions.
| Section per side | Matrix | LEDs | Lens behavior |
|---|---|---|---|
| Top strip | 21 × 5 | 105 | Clear / full color |
| Bottom strip | 21 × 5 | 105 | Red-filtered |
| Main panel | 17 × 10 | 170 | Red-filtered |
| Total | Per side | 380 | 760 across both sides |
Custom PCB Pinout
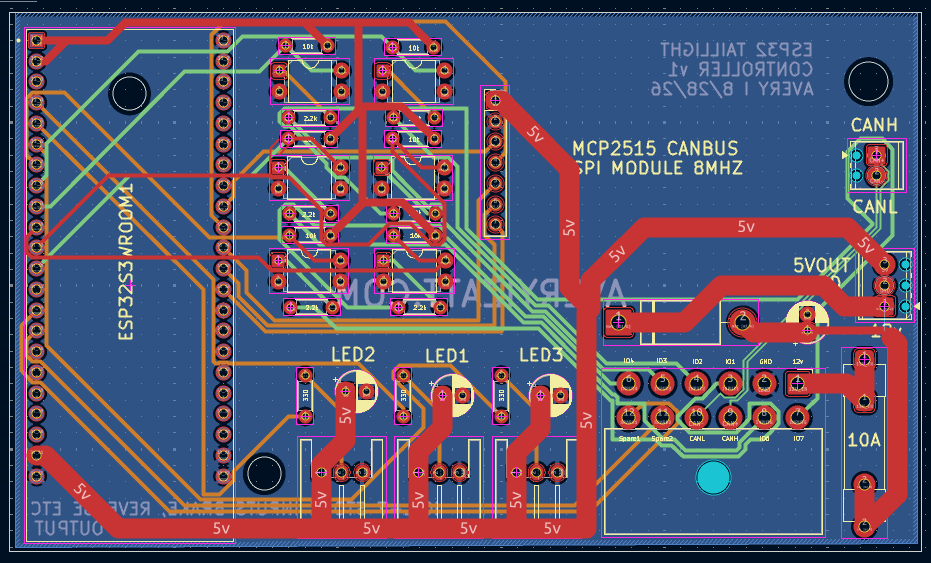
The PCB build maps the driver taillight to GPIO 4 and the passenger taillight to GPIO 6. GPIO 5 remains available as a third LED data output. The isolated vehicle inputs use shared brake, running-light, and reverse signals, with independent driver- and passenger-side turn inputs. That matches the way the factory signals need to be resolved while preserving a spare optocoupler channel.
| PCB connection | GPIO | Function |
|---|---|---|
| LEDDATA1 | 4 | Driver taillight |
| LEDDATA3 | 6 | Passenger taillight |
| LEDDATA2 | 5 | Spare LED output |
| OPTOGPIO1 | 7 | Brake input |
| OPTOGPIO2 | 15 | Running-light input |
| OPTOGPIO3 / 4 | 16 / 17 | Driver / passenger turn |
| OPTOGPIO5 | 18 | Reverse input |
| OPTOGPIO6 | 8 | Spare isolated input |
| CAN CS / MISO / MOSI / SCK | 38 / 37 / 40 / 41 | MCP2515 SPI bus |
| SPARE1 / SPARE2 | 46 / 9 | Future expansion |
The spare pins are intentionally left unconfigured in normal firmware. That prevents attached future hardware from being driven accidentally before its behavior is defined.
CAN Bus and Fault-Tolerant Operation
The onboard MCP2515 connects the taillight controller to the rest of the vehicle electronics network at 500 kbit/s. The existing protocol remains compatible with my other modules: ID 0x100 broadcasts taillight state every 100 ms, 0x101 receives commands, and 0x102 reports faults.
On this PCB revision the original CAN interrupt trace is isolated, so the controller polls the MCP2515 instead. The runtime CAN path is designed to stay non-blocking: one-shot transmission prevents endless retries when no node acknowledges a frame, failed transmissions back off, and the lighting logic continues even if the CAN network is disconnected. That separation is important because a communications fault must never stop the basic brake, turn, running, or reverse functions.
Lighting Safety Comes First
The visual effects are the fun part, but the firmware treats the controller as an automotive safety system first. Physical brake and reverse inputs always override CAN-requested animations. Each side resolves its state independently, which allows the controller to handle combinations such as brake plus turn without losing the required signal on either side.
- Hardware watchdog: monitors both the input task and rendering loop with a three-second timeout.
- Dual-core input handling: factory signals are sampled independently from LED rendering and shared through atomic snapshots.
- Crank holdoff: keeps the LEDs blank for 1.5 seconds after boot so a voltage sag during engine cranking produces a clean restart.
- Thermal protection: begins reducing brightness at 75°C and clamps to a safe minimum above 85°C instead of switching the lamps completely off.
- Bench self-test: holding the driver running-light input during power-up checks segments, pixels, colors, and every lighting state.
What happens when it fails
Testing in the car taught me something the bench never did. A WS2812 lamp keeps showing its last frame for as long as it has power. So a controller that simply stops sending leaves the lamps frozen on whatever was showing: a frame of the startup animation, or worse, the brake lights. On the car the lamps sometimes froze at key-on until I pressed the board’s button, because the controller had started on a supply that was still settling.
The fix wasn’t one watchdog, it was a set of independent layers, each catching something the one before it can’t see:

- Start twice on a settled supply. After a power-on or brownout, the controller waits out the crank holdoff, then restarts itself once so that it starts for real on stable power. It costs about 0.3 s at key-on and is aimed squarely at the frozen-at-key-on problem.
- A watchdog from the first instant. An RTC watchdog is armed in a constructor before
setup()even runs, so a hang in the Arduino core’s own start-up, the serial port or reading settings from flash still ends in a reset (after 10 s) rather than a dead controller. - An output guard for the failure that fools every other watchdog. If the LED transport refuses frames but everything else keeps running, the task watchdogs stay happy while the lamps freeze. After 0.15 s the guard rebuilds the transport in place with no restart, and if frames are still refused at 0.5 s it does a full reset.
- A hardware watchdog fed only by real output. The RTC hardware watchdog is only fed by frames that actually reached both lamps, and resets the system after 5 s without one.
- Fast return. After a watchdog, crash or output stall, the controller skips the crank holdoff and startup animation, so the lights are back in a fraction of a second.
- Safe mode. After three fault restarts in a row (the count lives in RTC memory so it survives every reset except loss of power), the LED current limit drops from 12 A to 4 A until the lights have run normally for 20 s. A supply that can’t carry the lights gets a gentler load instead of a reset loop.
- A current ramp. The estimated current may rise by 4 A per frame, so when every LED comes on at once the lights are on in the first frame and at full brightness one or two frames (25 to 50 ms) later, instead of slamming the supply.
There are also “second opinions” that do nothing while the part they back up works. Brake and reverse are read directly on the render core as well, and a line held for 60 ms counts even if the input task stopped reporting it. A lamp in the brake state with no pixel lit for 0.4 s is painted solid red. Brightness never drops below a safety floor while brake, reverse or a turn signal is requested. A failed CAN start is retried in the background, but never while brake or reverse is on, and the MCP2515’s control register is checked every second in case a supply dip reset it alone.
Every start is reported on the CAN fault ID (0x102, code 0x08) with the reset reason and flags, so the dash’s record shows each restart even though the dash boots later than the lights.
Reliable LED Output
Driving two long WS2812B chains while also servicing CAN and Wi-Fi requires predictable timing. This revision pins FastLED 3.10.3 and uses the synchronous ESP32 RMT driver with two memory blocks. Physical LED updates are limited to 50 frames per second. These changes keep output stable while the controller processes network traffic, the settings page, thermal monitoring, and vehicle inputs.
Web Configuration and New Effects
The ESP32 can create its own Wi-Fi access point or join an existing network and serve a built-in configuration page. From a phone or laptop I can adjust brightness, running-light intensity, signal colors, animation selection, frame timing, startup behavior, show mode, and custom scrolling text. Settings are stored in NVS, and live preview controls make it possible to test a state without applying 12V to every physical input.
The latest animation set also takes better advantage of the matrix-shaped panels. New road-use options include Contour Glide and Fox Louvers for running lights, Edge Lock for braking, and Arrowhead Sweep or Three-Bar Relay for turn signals. Show mode adds effects such as Afterburner, Tunnel Grid, and Apex Weave. Passenger-side geometry is mirrored in the panel layer, so directional effects remain symmetrical without maintaining separate artwork for each lamp.
The enclosure
The controller lives in a 3D-printed enclosure with a separate lid, designed around the custom PCB. Here are the print files.
Where the Project Stands
This update brings the custom PCB and the full taillight firmware together. The controller now has a clean hardware-specific build, isolated factory inputs, dependable dual-panel output, CAN telemetry and commands, a browser-based setup interface, and safety behavior that remains in control even when a higher-level feature fails.
The video above shows the updated system operating on the new controller. The next stage is continued vehicle-side validation: checking the harness under real voltage conditions, confirming behavior during cranking, and testing CAN traffic with the other modules installed in the car.